
Azure Template Specs managed via Azure DevOps with bicep
Azure template spec is a resource type within Azure used for storing an Azure Resource Manager (ARM) template for later use. By using template specs you have the ability to share ARM templates with other users within the organization as they also make use of the role-based access control within the Azure platform.
Note: At the time of writing Azure Resource Manager template specs are in public preview.
Why start using template specs
Today there are not a lot of good ways of sharing ARM templates within a organization. Template specs are really useful in situations where you want to share the templates or if you would like to create resources based on a specific template. This can for example be a VM in a specific VNET configuration or a reference architecture created fully in ARM templates.
The specs can be shared within the Azure platform as they are kept within a Resource Group. The templates can then be deployed to any subscription you have access to as everything is based on RBAC.
In one of my previous posts I already mentioned some information on how to work with template specs and how to create them.
Template specs highlights
As mentioned before template specs are preview at the time I was writing this article so the highlights mentioned below can change over time:
- Template specs can be managed via Azure PowerShell or Azure CLI.
Note: To use it with Azure PowerShell, you must install version 5.0.0 or later. To use it with Azure CLI, use version 2.14.2 or later.
- Template specs are Azure resources that contains a ARM template. This is not a specific ARM template but can be a template you created before.
- Template specs can be created by using the command "New-AzTemplateSpec" for PowerShell or "az ts create" for CLI
- Template specs can be retrieved by using the command "Get-AzTemplateSpec" for PowerShell or "az ts list" for CLI
Lifecycle Management
As template specs will really benefit your organizations therefor the lifecycle of these resources need to be managed in correct way. This is were Azure DevOps comes in by helping deploying and versioning the template specs. During the rest of this article we will go over the process of building an bicep file into a ARM template that will be used within a template spec.
Bicep
As you may know bicep is the new way of creating IaC against the Azure Platform as bicep is a DSL (Domain Specific Language) for ARM.
This is why we build up our template spec from a bicep file. More information on how to get started or how to integrate bicep within Azure DevOps can you find in other articles of this blog.
- Getting started with Project Bicep for Azure ARM
- Running bicep within Azure DevOps Pipelines
- Running bicep in GitHub Actions
During this guide we use a small sample that deploys an Azure App Service, Application Insights, Log analytics and Hosting plan that are all connected. The below snippet shows the bicep file that will be used.
param skuName string = 'S1'
param skuCapacity int = 1
param location string = resourceGroup().location
param appServicePlanName string
param websiteName string
param appInsightsName string
param logAnalyticsName string

resource appServicePlan 'Microsoft.Web/serverfarms@2020-06-01' = {
  name: appServicePlanName
  location: location
  sku: {
    name: skuName
    capacity: skuCapacity
  }
}

resource appService 'Microsoft.Web/sites@2020-06-01' = {
  name: websiteName
  location: location
  identity: {
    type: 'SystemAssigned'
  }
  properties: {
    serverFarmId: appServicePlan.id
    httpsOnly: true
    siteConfig: {
      minTlsVersion: '1.2'
    }
  }
}
resource appServiceLogging 'Microsoft.Web/sites/config@2020-06-01' = {
  name: '${appService.name}/logs'
  properties: {
    applicationLogs: {
      fileSystem: {
        level: 'Warning'
      }
    }
    httpLogs: {
      fileSystem: {
        retentionInMb: 40
        enabled: true
      }
    }
    failedRequestsTracing: {
      enabled: true
    }
    detailedErrorMessages: {
      enabled: true
    }
  }
}

resource appServiceAppSettings 'Microsoft.Web/sites/config@2020-06-01' = {
  name: '${appService.name}/appsettings'
  properties: {
    APPINSIGHTS_INSTRUMENTATIONKEY: appInsights.properties.InstrumentationKey
  }
  dependsOn: [
    appInsights
    appServiceSiteExtension
  ]
}
resource appServiceSiteExtension 'Microsoft.Web/sites/siteextensions@2020-06-01' = {
  name: '${appService.name}/Microsoft.ApplicationInsights.AzureWebsites'
  dependsOn: [
    appInsights
  ]
}
resource appInsights 'microsoft.insights/components@2020-02-02-preview' = {
  name: appInsightsName
  location: location
  kind: 'string'
  properties: {
    Application_Type: 'web'
    WorkspaceResourceId: logAnalyticsWorkspace.id
  }
}

resource logAnalyticsWorkspace 'Microsoft.OperationalInsights/workspaces@2020-03-01-preview' = {
  name: logAnalyticsName
  location: location
  properties: {
    sku: {
      name: 'PerGB2018'
    }
    retentionInDays: 120
  }
}
The bicep file is used to construct the ARM template in Azure DevOps in order to use the ARM file as a definition for the template spec.
Setting up the pipeline
To manage the lifecycle a Azure DevOps pipeline will be used that will perform severals tasks:
- Build the ARM template from the bicep file.
- Check if the resource groups for the template specs exists or other wise create it.
- Deploy or update the template spec
- Update the semantic version for the template spec by using the extension: Version number counter
Build the ARM template from the bicep file.
To build the ARM template from the bicep file the same principle is used that is available in the article "Running bicep within Azure DevOps Pipelines" with some small exceptions because the pipeline we will be using now will run on a windows agent.
steps:
- task: PowerShell@2
  displayName: "Install bicep"
  inputs:
    targetType: 'inline'
    script: |
      $installDir = New-Item -ItemType Directory -Path $(installPath) -Force
      $installDir.Attributes += 'Hidden'
      (New-Object Net.WebClient).DownloadFile("https://github.com/Azure/bicep/releases/latest/download/bicep-win-x64.exe", "$(installPath)\bicep.exe")
    pwsh: true
- task: PowerShell@2
  displayName: "Build bicep file"
  inputs:
    targetType: 'inline'
    script: |
      $(bicep) build $(System.DefaultWorkingDirectory)/$(filepath)
    pwsh: true
The above snippets shows the process of installing bicep on the agent and running the build process for a specified ARM template. As you may notice the other settings of the pipeline are omitted for clarity. The result of the second task will be the arm template that can be used for the template spec.
Resource group
As template specs are regular Azure resources they are also created within a resource group. For this reason we check during the execution of the pipeline if the resource group we want to use is available or needs to be created. This action will be done by using the Azure PowerShell task and running that runs a small PowerShell script.
- task: AzurePowerShell@5
  displayName: "Check resource group"
  inputs:
    azureSubscription: 'Subscription MPN Sandbox'
    ScriptType: 'InlineScript'
    Inline: |
      if (!(Get-AzResourceGroup "$(resourcegroupname)" -ErrorAction SilentlyContinue)){
          New-AzResourceGroup -Name "$(resourcegroupname)" -Location "$(location)"
      }else{
          Write-Output "The resource group already exists"
      }
    azurePowerShellVersion: 'LatestVersion'
    pwsh: true
This inline script will retrieve the resource group. If it is not present it will create it otherwise it prints out a message that the resource group already exists.
Deploying and updating the template spec
Now that the prerequisites for template spec is ready the deployment of it can be added to the pipeline. You may have read in the article "The new and shiny – Azure Template Specs" that this is done via the command "New-AzTemplateSpec". This command needs the following arguments:
- Name: The name of the template spec. This will also be the name of the resource in azure.
- Version: The version of the template spec.
- ResourceGroupName: The name of the resource group to deploy the template spec to.
- Location: The location for the template spec resource.
- TemplateFile: The ARM template for the template spec.
Filling this in results in an additional PowerShell task for the pipeline that creates the template spec.
- task: AzurePowerShell@5
  displayName: "Deploy template spec"
  inputs:
    azureSubscription: 'Subscription MPN Sandbox(b27ac091-3de5-46d1-8f61-add3171f6e52)'
    ScriptType: 'InlineScript'
    Inline: |
      New-AzTemplateSpec -Name "$(templateSpecName)" -Version 1.0 -ResourceGroupName "$(resourcegroupname)" -Location "$(location)" -TemplateFile "$(System.DefaultWorkingDirectory)/$(filepathArm)"
    azurePowerShellVersion: 'LatestVersion'
    pwsh: true
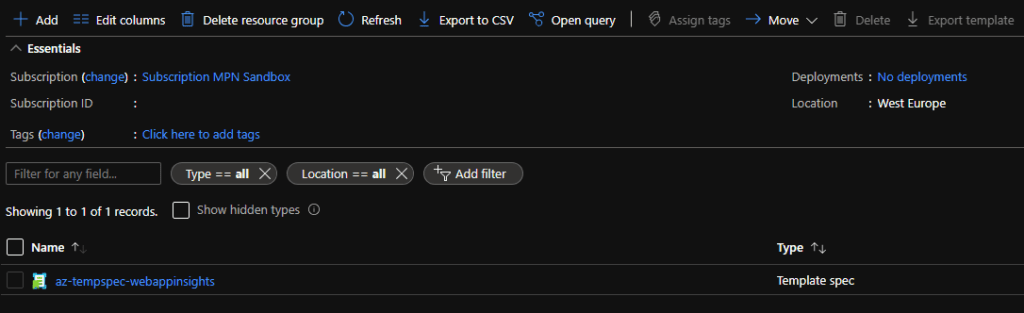
Executing this task will result into a template spec resource in Azure within the specified resource group.
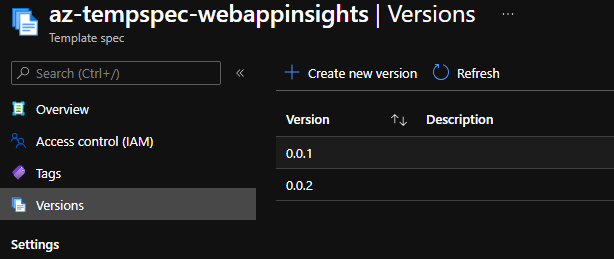
Updating the template spec can be done by just rerunning the pipeline. This will override the current version with the new ARM template.
Template versioning
This is were the task "Version number counter" comes in. This task can be used to automatically update the semantic version number on each run based on the configuration. For this it needs a specified variable with the existing version number and a Personal Access token to update the version number. More information about this task can be found here:
- task: versioncounter@1
  displayName: "Update version number"
  inputs:
    VersionVariable: 'versionnumber'
    UpdateMinorVersion: true
    MaxValuePatchVersion: '9'
    DevOpsPat: '$(pipeline-pat)'
With this configuration the version number is saved in a variable called "versionnumber". This means that the task that deploys the template spec needs to be updated to also leverage the version number. Running the pipeline multiple time will make sure that the specified versions are saved within the template spec.
Conclusion
Combining tooling and services like bicep, ARM, template specs and Azure DevOps is very useful for maintaining your resources and keeping them up-to-date.
The complete files used to write this article can be found on my personal GitHub:
Comments