Private Azure DevOps agent pool based the Microsoft Hosted Agents
In Azure DevOps it is possible to create a agent pool that references a Azure virtual machine scale set. This scale set can be based on one of the build in images but can also be based on a custom image.
The images that Microsoft uses for there build agents are made opensource. To be precise the code to make the images is opensource. Making very easy for us to build private agents with the same technology.
With the information in this repository we can build up our own build agents and use those as the default image for a Azure virtual machine scale set.
Creating the image
To create the image we need a couple of tools installed:
- Packer: HashiCorp Packer automates the creation of any type of machine image. It embraces modern configuration management by encouraging you to use automated scripts to install and configure the software within your Packer-made images. Packer brings machine images into the modern age, unlocking untapped potential and opening new opportunities. https://packer.io
- Azure CLI: The Azure command line interface: https://docs.microsoft.com/en-us/cli/azure/install-azure-cli-windows?view=azure-cli-latest&tabs=azure-cli
To install packer I use a tool called Chocolately.
choco install packer
Chocolately also makes sure that the PATH variable to packer is configured.
When the prerequisites are installed the first step is to clone the repository. The recommanded thing to do is to do this directly on the C:\ drive.
git clone https://github.com/actions/virtual-environments.git
Then import the helper module that is included with the virtual environment repository.
Set-Location C:\virtual-environments
Import-Module .\helpers\GenerateResourcesAndImage.ps1
Then the PowerShell function 'GenerateResourcesandImage' can be executed. For this the following arguments need to be supplied:
- SubscriptionId: The Id of the subscription were you want to create the image.
- ResourceGroupName: The resource group were the image will be created .
- ImageGenerationRepositoryRoot: The root path of the image generation repository source.
ImageType: The type of the image. In the repository the following types are supported:- Windows2016
- Windows2019
- Ubuntu1604
- Ubuntu1804
- Ubuntu2004
- AzureLocation: The location for the Azure Resources
- GithubFeedToken: Token to retrieve sources from GitHub. You can generate this token at the following location: User --> Settings --> Developer Settings --> Personal Access Token
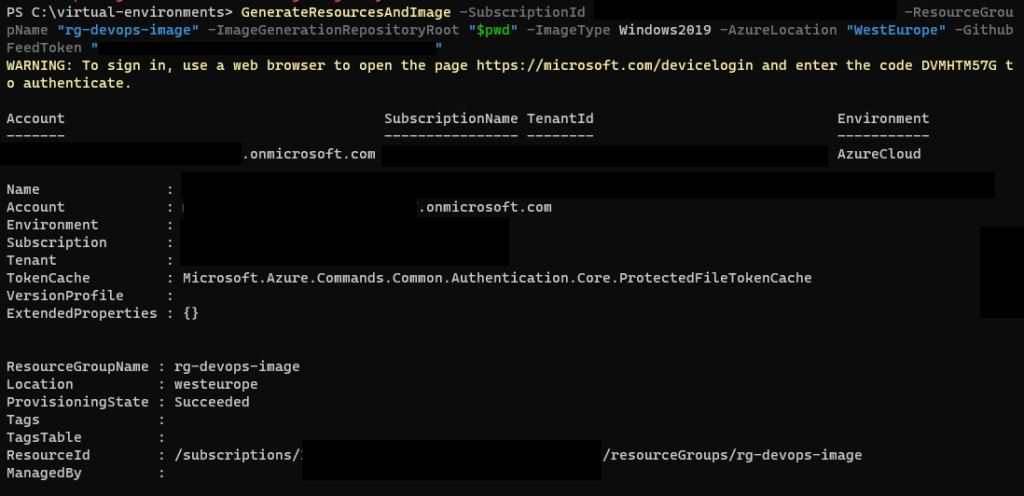
GenerateResourcesAndImage -SubscriptionId [Subscription ID] -ResourceGroupName "[Resourcegroup name]" -ImageGenerationRepositoryRoot "$pwd" -ImageType Windows2019 -AzureLocation "WestEurope" -GithubFeedToken "[GitHub Token]"
When running the script locally you are requested to sign-in to Azure. Make sure the account you are logging in with has the appropriate rights to create the resources.
Note: Executing this command will start up the generation of the image that can take about 6 till 7 hours, depending on the image you are building. Building the Windows 2019 image on my machine took 6 hours and 51 minutes. The function will also create a resource group for a temporary VM so make sure that you do not have active policies that could interfere this process.
In the Azure subscription you will see resources appearing:
- Azure Storage Account: In the specified resource group a storage account will be created to save the VHD of the image.
- Resource Group: A resource group with a generated name will appear. In this resource group the VM will be created to generate the image.

After a long time (in my situation 6 hours and 51 minutes later) the VHD is created and saved within the storage account.

Creating the Virtual Machine Scale Set
With the VHD saved within the storage account. We can create a image based on that disk. To do this I used the cloud shell. Open the cloud shell and perform this command:
az image create -g rg-devops-image --os-type Windows --source [URI to VHD in storage] --name privatehostedimage
- -g: The name of the resource group
- --os-type: The type of the operating system of the image
- --source: The URI to the VHD in the storage account
- --name: The name for the image
With the image in place we can create a Azure Virtual Machine Scale set that we can use within Azure DevOps. For this use the following command and run it within the Cloud Shell.
az vmss create \
--name [name for the scale set] \
--resource-group [resource group name] \
--image [name of the image] \
--vm-sku Standard_D2_v3 \
--storage-sku StandardSSD_LRS \
--authentication-type password \
--instance-count 2 \
--disable-overprovision \
--upgrade-policy-mode manual \
--single-placement-group false \
--platform-fault-domain-count 1 \
--load-balancer ""
Make sure that when u create the set the following things are configured:
- Overprovisioning should be disabled.
- The upgrade policy should be set to manual.
Configuring the Agent Pool in Azure DevOps
The last step is to configure the agent pool in Azure DevOps. The Agent Pool can be configured on two levels: Project or Organization. In this example we will create it on the organization level.
- Go to the settings page of the organization.
- Click on Agent Pools under the category Pipelines.
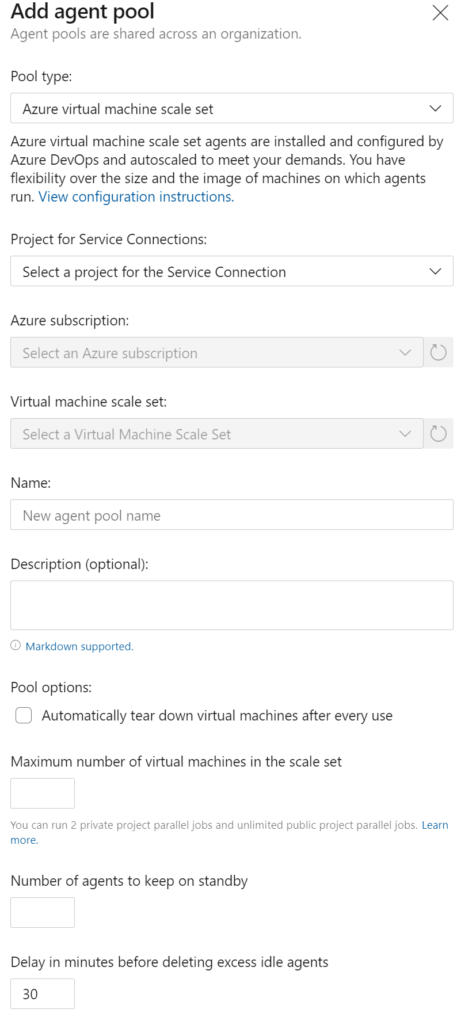
- Click on the top right button called "Add pool"
- Select: "Azure Virtual machine scale set" as the agent pool type
- Select the project that has the correct "Service Connection" to the subscription that contains the scale set or create a new service connection by clicking on the Authorize button.
- Select the correct scale set and configure the other options.
Note: At the time of writing only Service Connections with Client ID, Client Secret credentials are supported.
Now you can use agents that are privately hosted and make sure you have the capacity for additional demands.
Comments