
Building and Deploying Azure DevOps extensions with Azure Pipelines
Azure DevOps extensions can be build and deployed by using Azure Pipelines. In the Azure DevOps marketplace there is a extension available that will help us to get everything up and running. In this blog post we will use the following extensions from the Marketplace:
- Azure DevOps Extension Tasks: Task made by "Microsoft DevLabs" for constructing Azure DevOps extension packages and deploying them to the marketplace.
- Version number counter: Task made by myself that will help with controlling the version number of the extensions. More information about this task can be found on my blog.

Building the Azure Build Pipeline
With the extensions installed create a new build pipeline. In the new build pipeline window choose the visual designer option.

In the screen that follows choose GitHub as we will use GitHub as the source location. If you want to use Azure Repos that isn't a problem. Authorize the connection and make sure you select the correct project and branch.

The build pipeline will open up. The first thing we will configure is the trigger of the build. Because I save multiple extensions within the same repository I have enabled the "Continuous Integration" option and also apply a branch filter and a path filter. The path filter is used to make sure the build is only started when something has changed within the specified path.

Next up are the "Variables". We add a variable called "buildversion" that the "Version number counter" extension will use to increment the version number. Besides that the variable will be used as the build number format (under the options tab).


With all these configuration setup we can start adding tasks. For this build pipeline we will use three tasks.

Version number counter
This extension will be used to increment the version number of the extension. The option "Automatically update minor number" is disabled because I want to update this number manually.

Package Extension
Packaging a extension into a vsix file is done via this extension. In this extension we override some specific values like the "publisher" and the "extension version". The extension version is overwritten with the $(Build.BuildNumber) which is the same as $(buildversion) that we increment each time a build runs.

Publish Artifact
The last task will be used to save the package to the artifact location called "azurerbac". The path that will be published is a variable called: "$(Extension.OutputPath)". This variable is a output variable from the "Package Extension" tasks and represents the location of the vsix file.

This completes the Azure build pipeline. You can test your pipeline by queuing the build.
Building the Azure Release Pipeline
With the build complete we will create a release pipeline that adds the packaged extension to the marketplace. Setting up the pipeline is done in two easy steps:
Adding the artifact
In a new release pipeline add a artifact. For simplicity set the "Default version" to "Latest version" and add a short alias name. Make sure the artifact will trigger the deployment of the stage that will be added during the next step.

Setup the Stage
In the release add an empty stage and add a single task named: "Publish Extension". To get this extension up and running a Visual Studio Marketplace service connections needs to be added. Do this by clicking the "New" button next to "Visual Studio Marketplace connection" when you just added the tasks to the stage.
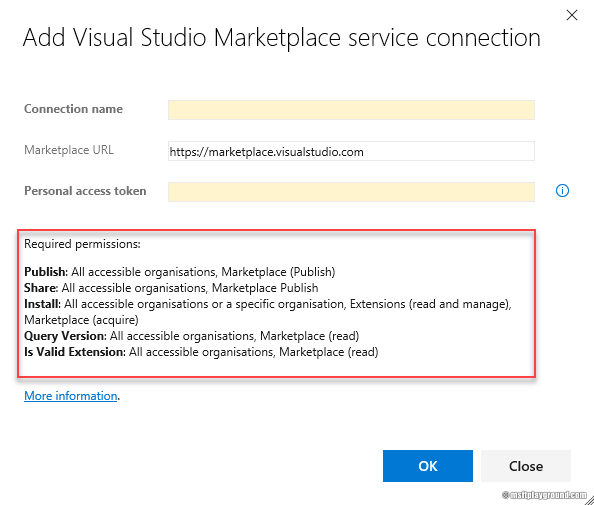
To use this connection type you will need to generate a Personal Access Token for a user that has access to your Marketplace. The specific PAT requirements are shown at the bottom of the image. With this configured you can setup the task completely. Pay good attention to the visibility and pricing parameters of the task.

Save the release pipeline and run the complete process when complete you will notice that your extension has been added to the Visual Studio Marketplace.
Extending your Azure Release Pipeline
When this is up and running you can easily extend the pipeline to also deploy a private version of your extension the complete pipeline could look like the image below.

Comments