Kubernetes (AKS) attached to Azure Storage (Files)
Kubernetes (AKS) can be used for many situations. For a client we needed to make files available trough a Kubernetes Pod. The files needed to be shared between containers, nodes and pods.
To make these files available we used a file share that gave us a couple of advantages:
- Files can be made read-only for a Pod.
- Files can be added via a Windows Network drive.
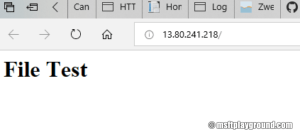
To prove the scenario worked we used a simple "html" file when we opened the external endpoint.
<html>
<head>
</head>
<body>
<h1>File Test</h1>
</body>
</html>
The container type we used within Kubernetes is "httpd" which is a container with a simple apache web server. (https://hub.docker.com/_/httpd/).
Azure Storage Account
For the file share we choose "Azure Files". With Azure Files we can share a File Share with the Kubernetes Pods and Windows devices. For this you need to create an Azure Storage account.
- Navigate to the Azure Portal (https://portal.azure.com).
- Click "Create a resource" and search for "storage account".
- Choose "Storage account - blob, file, table, queue".
- Fill in the correct properties and click on "Create".
- When the storage account is created open the resource and click on "Files".
- In the Azure Files blade create a new "File share".
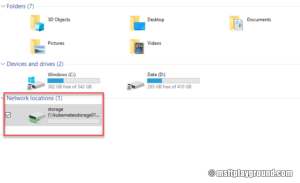
With the Azure File Share created you can connect it to your windows machine.
- Click on the file share in the Azure File blade.
- Click on "connect".
- In the connect blade it will present the PowerShell script that you can run on your environment to attach the file share.
$acctKey = ConvertTo-SecureString -String "[key]" -AsPlainText -Force
$credential = New-Object System.Management.Automation.PSCredential -ArgumentList "Azure\kubernetesstorage01", $acctKey
New-PSDrive -Name Z -PSProvider FileSystem -Root "[storage]" -Credential $credential -Persist
"Note: Make sure you do not run this script as administrator. Running this script as administrator will add the drive but it will not show up in windows explorer for your account."
Kubernetes Secret
For the authentication to the file share a secret entry needs to be made within Kubernetes. The secret will contain a couple of properties:
- Storage account name
- Storage access key
Adding the secrets Kubernetes can be done via a yaml file or the kubectl command line.
When using the yaml option encode the properties in base64. You can google for an online solution. I used: https://www.base64encode.net/ for example.
Command line
kubectl create secret generic storage-secret --from-literal=azurestorageaccountname=[storage name] --from-literal=azurestorageaccountkey=[account key]
Yaml
apiVersion: v1
kind: Secret
metadata:
  name: storage-secret
type: Opaque
data:
  azurestorageaccountname: [base64 account name]
  azurestorageaccountkey: [base64 account key]
The yaml will needs to be applied to Kubernetes by using the command:
kubectl apply -f [filename]
Kubernetes deployment
For getting the container up and running we create a Kubernetes deployment that runs the container.
apiVersion: apps/v1beta1
kind: Deployment
metadata:
  name: webfile
spec:
  replicas: 1
  template:
    metadata:
      labels:
        app: webfile
    spec:
      containers:
      - name: webfile
        image: httpd
        imagePullPolicy: Always
        volumeMounts:
        - name: azurefileshare
          mountPath: /usr/local/apache2/htdocs/
          readOnly: true
        ports:
        - containerPort: 80
      volumes:
      - name: azurefileshare
        azureFile:
          secretName: storage-secret
          shareName: storage
          readOnly: false
This deployment is a simple one that creates a single pod and attaches a volume to the mountPath: /usr/local/apache2/htdocs/
The mountPath is the starting point for the apache web server meaning that everything that is placed on the file share will be exposed by the pod.
The deployment needs to be applied by using the following command:
kubectl apply -f [kubernetes deployment file]
Kubernetes service
To get it externally available we have to take one more step. That step is configuring a Kubernetes service of the type "LoadBalancer".
apiVersion: v1
kind: Service
metadata:
  name: webfile
spec:
  type: LoadBalancer
  ports:
  - port: 80
  selector:
    app: webfile
The service needs to be applied by using the command:
kubectl apply -f [service deployment file]
Applying the service should generate an external IP address. Checking if it is provisioned correctly you can look on the Kubernetes Dashboard:
Or by running the following kubectl command:
kubectl get svc [service name]
Result
Opening the IP in the browser will result in an empty page. Uploading the sample html file named "index.html" will have the expected result.


