Azure Active Directory B2C
Azure Active Directory B2C is a feature released a couple of weeks ago in Azure and is still in preview. Azure Active Directory B2C is a consumer identity and access management in the could, some key features of this component are:
- Improve connection with your consumers.
- Pay only for what you use.
- Scale to a large amount of consumers.
- Let consumers use their social media accounts.
- Customizable workflow for consumer interactions.
AAD B2C can be attached to the following Identity providers:
- Amazon
- Microsoft
Setting this up takes just a couple of steps. Doing this requires you to login to the old old Azure Management portal:
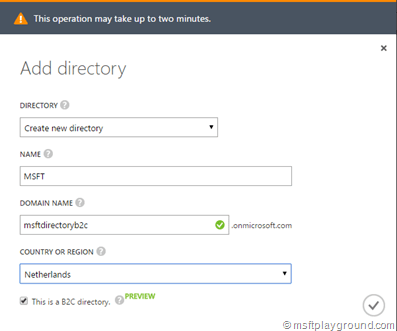
On the bottom of the management portal click on “New”, select “App Services” and then “Active Directory”.
Fill in all the information and make sure, you select the checkbox “This is a B2C directory”. When done press the button and the Active Directory will be created.
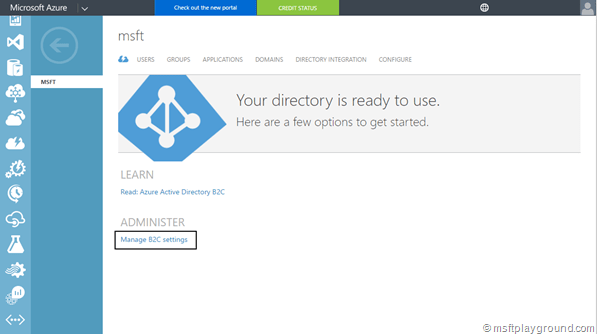
When it is created identity providers, policies and applications can be registered. All of these settings need to be done within the new Azure Portal by navigating to the Azure Active Directory Management Blade. You can get to the specific configuration page by using the link in the old portal from the Azure Active Directory dashboard.
Identity providers can be added to active directory by using the Identity Providers option within the Azure Active Directory Management Blade. How the external Identity providers can be configured is described here: https://azure.microsoft.com/en-us/documentation/articles/active-directory-b2c-setup-msa-app/
Applications are the applications you will be using in combination with the Azure Active Directory B2C. These can be added by going to the configuration page of the new portal. Within the new portal, define a application by clicking on “Applications” and then “Add” give the application a name and specify that it is a “Web App / Web API”. Make sure you specify a redirect URI to make sure the providers knows were to redirect you (this needs to be the URL of your application).
Save the application to start with the definition of the policies. Policies are definitions that contain how certain actions will be performed and what data it will contain. Policies that can be created within the preview are:
- Sign-Up
- Sign-In
- Sign-Up or Sign-In
- Profile editing
- Password reset
For these policies a couple of things can be configured as you can see in the below screenshot.
- Identity providers: This specifies which Identity providers can make use of the policy. By default you have only one identity provider: Local Account (Azure Active Directory Account).
- Sign-up/in/edit attributes: This specifies which attributes will be used for the policy.
- Application claims: This specifies which attributes are added to the claim for your application.
- Token, session & SSO config: Configuration for the sign-in policy.
- Multifactor authentication: Use multifactor authentication.
- Page UI customization: Use a customized page for your policy.
Create the policies you need for your application, for the sample application that can be found on GitHub (Link at the bottom of the page) you need three policies: Sign-Up, Sign-In and Profile editing.
When the policies are ready test them by opening the policies window and clicking on a specific policy you created.
Click “Run now” and the policy will be run in the context of the application you have selected. If everything works correctly the sample application can be downloaded and configured. The configuration that needs to be adjusted and extended is in the Web.Config file:
<appSettings>
    <add key="webpages:Version" value="3.0.0.0" />
    <add key="webpages:Enabled" value="false" />
    <add key="ClientValidationEnabled" value="true" />
    <add key="UnobtrusiveJavaScriptEnabled" value="true" />
    <add key="ida:Tenant" value="[Enter the name of your B2C directory, e.g. contoso.onmicrosoft.com]" />
    <add key="ida:ClientId" value="[Enter the Application Id assigned to your app by the Azure portal, e.g.580e250c-8f26-49d0-bee8-1c078add1609]" />
    <add key="ida:AadInstance" value="https://login.microsoftonline.com/{0}{1}{2}" />
    <add key="ida:RedirectUri" value="https://localhost:44316/" />
    <add key="ida:SignUpPolicyId" value="[Enter your sign up policy name, e.g. b2c_1_sign_up]" />
    <add key="ida:SignInPolicyId" value="[Enter your sign in policy name, e.g. b2c_1_sign_in]" />
    <add key="ida:UserProfilePolicyId" value="[Enter your edit profile policy name, e.g. b2c_1_profile_edit]" />
</appSettings>
Problems
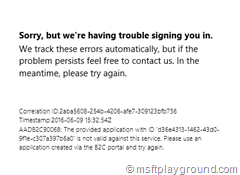
Azure Active Directory is in preview and that is why you can run into specific problems. One problem that I encountered was the one in the screenshot below:
- The provided application with ID ‘’ is not valid against this service. Please use an application created via the B2C portal an try again.
I checked the ID of the application and all looked fine. The problem was that I added the application to the Azure Active Directory B2C in the old Azure portal, the URL constructed for that type of applications are constructed differently (v1.0 vs. v2.0) then the way used in the Azure Portal Blade.
Recreating the application in the Azure Blade fixed the issue.
References:


