Securing an API app with an Application Identity - Part 2
In the previous post the API app was configured and altered to support Application Identity security. The next step is to make a client application ready to call the API’s in a secured way.
In order to do this the Azure Active Directory needs to be aware of the application. For this the needs be added to Active Directory.
Azure Active Directory
Open the old Azure portal : https://manage.windowsazure.com. Open up the Active Directory and click on the “Applications” tab.
In the bar at the bottom of the screen a new application can be added by selecting new. Selecting “New” will open a wizard were in you can add the API application.
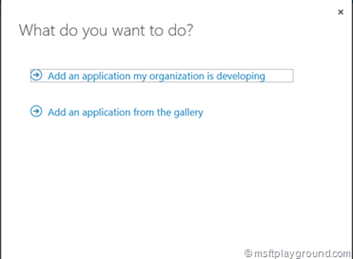
Select the option “Add an application my organization is developing”.
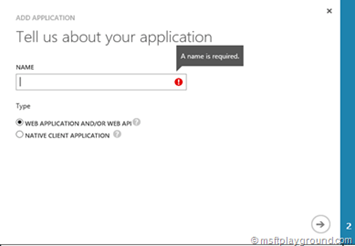
Enter the name of the application and since our application is an Web App select “Web Application and/or Web API” and click next.
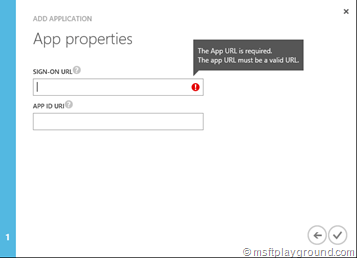
Fill-in a Sign-On URL if you do not have a specific sign-in URL fill in your default URL for example “https://example.com” (Note: The URL needs to be secured with SSL).
The APP ID URI is a URL specific for your tenant, this URL will need to contain the tenant name. It needs to be constructed in the following way: https://[tenant-name]/[app-name]
Save the options, the configuration screen of the application will be opened.
On this screen we will need to do two things. Generate a App Key in order to authenticate the application and grant the application access to the API.
To generate a new App Key select a specific duration for example 2 years. After saving the configuration the App Key will be generated. Copy the App Key straight away because the App Key will not be visible after you navigate away from the page. If this happens a new key needs to be generated.
We now have to add a permission to other applications. For this click on “Add Application”.
In the dialog search for the application by first selecting “All Apps” in the show property and then selecting your application.
After saving the application is added to the list and the last step we need to take is to delegate the permissions to the API application, by selecting “Delegating Permissions”
Save the complete configuration. Now we need to make a few adjustments to the code in order to call the API.
Code Changes
First off all we need to add some configuration values to the web.config.
<add key="auth:ClientId" value="[ClientID]" />
<add key="auth:AppKey" value="[AppKey]" />
<add key="auth:Tenant" value="[Tenant]" />
<add key="auth:AADInstance" value="https://login.microsoftonline.com/{0}" />
- ClientID: Unique identifier for the application in Azure.
- AppKey:Credential for the application to authenticate to Azure AD.
- Tenant:The name of the Azure AD tenant in which you registered the application ([tenant].onmicrosoft.com)
- AADInstance:This is the instance of Azure, for example public Azure or Azure China.
With these properties in the web.config we can start making calls to the API in a secured way. The first step in doing this is accruing the bearer token from Azure Active Directory.
internal string GetBearerToken() {
    string retVal = string.Empty;

    AuthenticationContext authContext = new AuthenticationContext(AuthConfiguration.Authority);
    ClientCredential clientCredential = new ClientCredential(AuthConfiguration.ClientId, AuthConfiguration.AppKey);

    int retryCount = 0;
    bool retry = false;
    AuthenticationResult authResult = null;
    do {
        retry = false;
        try {
            authResult = authContext.AcquireToken(AuthConfiguration.ResourceId, clientCredential);
        } catch (AdalException ex) {
            //log or retry
        }

    } while ((retry == true) && (retryCount < 3));

    retVal = authResult.AccessToken;
    return retVal;
}
The “AuthConfiguration” class is a object that retrieves the Authentication settings from the web.config.
When you required a bearer token you can try to “Get” information or “Post” information to the API.
public T GetObjectsSecured<T>(string endpoint) {
    T retVal = default(T);

    string token = GetBearerToken();

    if (!string.IsNullOrEmpty(token)) {
        using (WebClient webClient = new WebClient()) {
            webClient.Encoding = Encoding.UTF8;
            webClient.Headers.Add(HeaderConsts.ContentType, HeaderConsts.JsonContentType);
            webClient.Headers.Add(HttpRequestHeader.Authorization, HeaderConsts.Bearer + " " + token);
            string returnJson = webClient.DownloadString(endpoint);

            retVal = JsonConvert.DeserializeObject<T>(returnJson);
        }
    }

    return retVal;
}

public bool UpdateObjectSecured<T>(T item, string endpoint) {

    bool retVal = false;
    Uri endpointUri = new Uri(endpoint);
    string serialized = JsonConvert.SerializeObject(item);

    string token = GetBearerToken();

    if (!string.IsNullOrEmpty(token)) {
        using (HttpClient webClient = new HttpClient()) {
            webClient.DefaultRequestHeaders.Authorization = new AuthenticationHeaderValue(HeaderConsts.Bearer, token);
            using (HttpRequestMessage inputMessage = new HttpRequestMessage()) {
                inputMessage.Content = new StringContent(serialized, Encoding.UTF8, HeaderConsts.JsonContentType);
                inputMessage.Headers.Accept.Add(new MediaTypeWithQualityHeaderValue(HeaderConsts.JsonContentType));
                HttpResponseMessage message = webClient.PostAsync(endpointUri, inputMessage.Content).Result;

                if (message.StatusCode == HttpStatusCode.OK) {
                    retVal = true;
                }
            }
        }


