SharePoint 2010 Content Organizer Feature
Within SharePoint 2010 Microsoft has changed a lot of the content management features. One of those features is content routing which you can do with the Content Organizer Feature.
When you activate the Content Organizer feature on your site (Web scoped feature). It will automatically create a Drop-off library for you.
All the documents that you upload to the site will be uploaded to the Drop-off library and that library will then route you document to the correct library or folder.
Settings
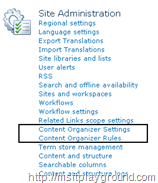
 The settings for the content organizing can be changed by using two web settings features that can be found under the category “Site Administration” on the “Site Settings” screen.
With the option “Content Organizer Rules” you can specify specific rules to route you content within the Site or outside your site collection.
When you want your content to be routed outside your site collection the other site were you want the content to move to also has to have the “Content Organizer” feature enabled.
Besides that you will have to enable the option “Sending to another site” within the “Content Organizer Settings”
After you have enabled this option you also have to specify the site were the content has to be routed to as a sent to location within central administration. This can be done by following these steps:
- Navigate to “Central Administration”
- Click on “General Application Settings”
- And then click on “Configure send to connections”
On the screen that appears you can specify your sent to location.
If you specify a rule that routes a document to another site collection the document will be placed into the drop-off library of the destination site collection.
The document does get routed to a certain place directly but will be prosed by a Timer job. This timer job is scheduled ones a day. You can find this timer job by following these steps:
- Navigate to “Central Administration”
- Click on “Monitoring”
- Click on “Review Job Definitions” under the category “Timer Jobs”
- Then find the “Content Organizer Processing” Job specified for you web application.
By clicking the name of the job you can reschedule the job to run within another time frame. Besides that you can also click the “Run now” button.
Routing Documents and Workflows
When you route documents to a document library on which you have connected workflows, those workflows will not start automatically. If you take a look in the ULS log you will find a message like this:
“Declarative workflows cannot automatically start if the triggering action was performed by System Account. Cancelling workflow auto-start.”
It is said that Microsoft knows this bug so lets hope the will fix it in some kind of service pack.
So what can you do about this issue. You will have to create a Item event receiver on the list that will start the workflow associations of the list item:
public override void ItemAdded(SPItemEventProperties properties)
{
    SPListItem addedItem = properties.ListItem;
    SPWorkflowManager manager = addedItem.ParentList.ParentWeb.Site.WorkflowManager;
    SPWorkflowAssociationCollection assoCollection = addedItem.ContentType.WorkflowAssociations;

    foreach (SPWorkflowAssociation asso in assoCollection)
    {
        manager.StartWorkflow(addedItem, asso, "");
    }

    base.ItemAdded(properties);
}
Custom routing
To be more flexible with the routing of your documents you can also create a custom router. I will discuss this option in a later post if there are enough people that will want to here about it.
