Branding a SharePoint site – Part 1
Within SharePoint and WSS you have the possibility to brand your site. You can do this on several ways:
- A custom style sheet.
- A custom theme.
I think the best way to brand your SharePoint site is to create a custom theme.
You can create a theme by copying one of the themes folders in the “C:\Program Files\Common Files\microsoft shared\Web Server Extensions\12\TEMPLATE\THEMES” directory. When you have a copy of a directory you have to rename it to whatever you like.
In this article we will use as example a copy of the “Simple” theme and rename it to “motion10”.
In the directory you have three files that are necessary to create a theme. The images can be deleted.
INF file
In this file you can find information about your theme. The file contains two sections the [info] section and the [titles] section.
In the [info] section information is given about the theme. In this section we have to change the title from “simple” to “motion10”.
In the [titles] section the title of the theme is given for each language code besides the title for the language code 1033. This title is saved into SPThemes.xml file (This file will be discussed later in this article).
After we made the changes to the file we save and rename it. You have to give it the same name as your folder. We will rename it from “Simple.inf” to “motion10.inf”.
Theme.css
The theme.css file is the style sheet file off the theme. In this file you will have to define your own styling.
mossExtension.css
The mossExtension.css is an extension file for the Theme.css file. When the Theme.css file is loaded it will be extended with the content of this file.
When you want to create a custom theme you can use several tools to help you edit the theme.css file. One of my favorites is the Web Developers tool in Internet Explorer 8. You can use this tool by opening your SharePoint site and selecting: “Tools – Developer Tools” or just press F12.
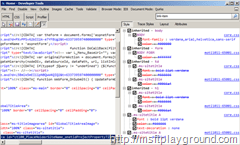
This will open a window like below. If you select the arrow at the top of the page you are able to select a section of your site and see the css styling of it.
On my SharePoint site I have selected the site title. On the right side of the developer tool you can see the styling of the site title. Every item that is stripped away will not be used so you can see that the colour of the title is changes to #0066a4 in moti1011-65001.css. This file is the theme.css file in our motion10 theme folder.
When you are done with the creation of the theme you have to make it available within the SharePoint farm. The theme can be added by updating the “SPThemes.xml” file within the following directory:
C:\Program Files\Common Files\microsoft shared\Web Server Extensions\12\TEMPLATE\LAYOUTS\1033
If you examine the file you can see that every theme has its own section. You have to add a section for your theme. You can do this by copying one of the Templates nodes and pasting it into the file and change the following properties:
- TemplateID: The ID of your template. This has be the same name as your folder. In our example it will be “motion10”.
- DisplayName: This is the display name for your theme.
- Description: This is the description of your theme.
- Thumbnail: This is the URL to a picture that represents your theme. This will be shown on the themes page. Example: “images/motion10/theme/theme.jpg”.
- Preview: This is the URL to a picture that represents your theme. Example: “images/motion10/theme/theme.jpg”.
When you save the file the theme will be available in the SharePoint Farm.
“Important: When you use multiple servers in the SharePoint farm you will have to change the SPThemes file on every server. You also have to create the themes folder on every server.”
Manually editing of files in the farm is not desired and support. To solve this you have to create a solution using WSP Builder and add your Theme folder to the right path in your solution. You also have to make changes to the “SPThemes.xml” so you also add this file to your solution. You will have a problem with this because you have the complete file and extend it with you section. When you deploy your solution the out of the box file will be overwritten. But what happens when another SharePoint developer also makes a theme en deploys it to the server. He will also overwrite the file with the result that your theme will be deleted.
To work around this problem you have to create a farm feature that will kick off a timer job to alter the SPThemes file.
First we have to create a farm scoped feature that has a feature receiver.
 <?xml version="1.0" encoding="utf-8"?>
 <Feature  Id="e0c634c2-5378-4fe6-927b-03aa895b5d8d"
               Title="motion10 Theme Installer : motion10"
               Description="Feature for adding the motion10 theme to the SharePoint Farm."
               Version="12.0.0.0"
               Hidden="FALSE"
               Scope="Farm"
               DefaultResourceFile="core"
               ReceiverAssembly="Motion10.SharePoint.Theme, Version=1.0.0.0, Culture=neutral, PublicKeyToken=09e87b786333535e"
               ReceiverClass="Motion10.SharePoint.Theme.ThemeInstaller"
               Creator="Maik van der Gaag"
               ImageUrl="motion10/FeaturesIcon.png"
               ImageUrlAltText="http://www.motion10.com"
               xmlns="http://schemas.microsoft.com/sharepoint/">
   <Properties>
     <Property Key="Theme:TemplateID" Value="motion10" />
     <Property Key="Theme:DisplayName" Value="motion10" />
     <Property Key="Theme:Description" Value="Theme for enabling the motion10 styling." />
     <Property Key="Theme:Thumbnail" Value="images/motion10/theme/theme.jpg" />
     <Property Key="Theme:Preview" Value="images/motion10/theme/theme.jpg" />
   </Properties>
 </Feature>

In the properties section of the feature we have defined 5 properties. These properties represent the values that you have to fill into the SPThemes.xml.
In the SPFeatureReceiver we will start the timer job to insert the values into the file.
public override void FeatureActivated(SPFeatureReceiverProperties properties) {
         RunJobNow(false, properties);
 }

 public override void FeatureDeactivating(SPFeatureReceiverProperties properties) {
         RunJobNow(true, properties);
 }

 public override void FeatureInstalled(SPFeatureReceiverProperties properties) {
 }

 public override void FeatureUninstalling(SPFeatureReceiverProperties properties) {
 }
In the FeatureActivated and FeatureDeactivating event we call a method called “RunJobNow” with two properties. These properties represent a boolean if the section must be deleted and the property bag of the feature for retrieving the property values.
public void RunJobNow(bool delete, SPFeatureReceiverProperties prop) {

    SPFarm farm = prop.Definition.Farm;

    InstallThemeTimerJob newJob = null;

    foreach (SPService service in farm.Services) {
       if (service.Name == serviceName) {

          newJob = new InstallThemeTimerJob(service, prop.Definition.Id, delete);

          foreach (SPJobDefinition def in service.JobDefinitions) {
             if (def.Name == newJob.Name) {
                def.Delete();
             }
          }
         break;
       }
    }

    newJob.Schedule = new SPOneTimeSchedule(DateTime.Now.AddHours(-2.0));
    newJob.Title = string.Format("{0} Theme {1} for Feature {2}", delete ? "Delete" : "Install", prop.Definition.Properties["Theme:TemplateID"], prop.Definition.Id);
    newJob.Update();
 }
The RunJobNow method will find a service called “WSSAdministration” on the farm. We need to find a service because the timer job needs to be attached to a service. By creating a new InstallThemeTimerJob object you create a new timer job in SharePoint. By adding the Schedule to the InstallThemeTimerJob object you can ensure that the job will run immediately.
When we create a new InstallThemeTimerJob object you can see that we have to define three properties. These properties must be defined to let the timer job know what to do.
When we have finished the feature it is time to create the timer job. In the SPJobDefinition we have four read only strings that define some values we need:
- filePath: The path to the SPThemes.xml file : “TEMPLATE\\LAYOUTS\\1033\\SPTHEMES.XML”
- deleteKey: The key of the property in the property bag.
- featureKey: The key of the property in the property bag.
- documentNameSpace: The namespace of the xml document.
Within the timer job we have five properties to retrieve the properties from the feature definition. These properties need to be retrieved for adding our Templates section to the SPThemes file.
 public string TemplateID {
    get {
       SPFeatureDefinition def = Farm.FeatureDefinitions[this._featureID];

       SPFeatureProperty prop = def.Properties["Theme:TemplateID"];

       return prop.Value;
    }
 }
For the initiation of our timer job we will have to insert two properties in the property bag. These properties are “_delete” and “_featureid”.
private readonly string deleteKey = "C11B44D604004a1d9CD9D0CAB326373F_Delete";

 private bool _delete {
    get {
       if (this.Properties.ContainsKey(deleteKey)) {
          return Convert.ToBoolean(this.Properties[deleteKey]);
       } else {
          return false;
       }
    }
    set {
       if (this.Properties.ContainsKey(deleteKey)) {
          this.Properties[deleteKey] = value.ToString();
       } else {
          this.Properties.Add(deleteKey, value.ToString());
       }
    }
 }
For the creation of a timer job you also need to define a LockType. This LockType is very important because the timer job has to be run on every server in the farm. For accomplishing this we will have to use SPLockType.None ( http://www.shillier.com/archive/2009/05/01/where-is-my-timer-job.aspx)
 public InstallThemeTimerJob() {
 }

 public InstallThemeTimerJob(SPService service, Guid featureID, bool delete)
    : base("Themes Installer TimerJob", service, null, SPJobLockType.None) {

    //save the properties
    this._delete = delete;
    this._featureID = featureID;
 }
On the execution of the timer job we will execute a method called ChangeThemesFile(). Within this method we will add or delete a section in the SPThemes file that is defined in the properties of the feature definition.
private readonly string filePath = "TEMPLATE\\LAYOUTS\\1033\\SPTHEMES.XML";
private readonly string documentNameSpace = "http://tempuri.org/SPThemes.xsd";
public override void Execute(Guid targetInstanceId) {
base.Execute(targetInstanceId);
this.ChangeThemesFile();
}
private void ChangeThemesFile() {
XNamespace ns = documentNameSpace;
string spThemesContent = string.Empty;
XDocument doc = XDocument.Load(SPThemesFile);
var element = from b in doc.Element(ns + "SPThemes").Elements(ns + "Templates")
where b.Element(ns + "TemplateID").Value == this.TemplateID
select b;
Twitter
Facebook
LinkedIn

